一、背景
为了了解设备驱动程序的框架,在此编撰一个简单的字符驱动程序,借此来对驱动程序的框架进行一个简单的了解。
嵌入式进阶教程分门别类整理好了,看的时侯非常便捷,因为内容较多linux 发邮件,这儿就截取一部份图吧。
须要的同事私信【内核】即可申领。
内核学习地址:Linux内核源码/显存调优/文件系统/进程管理/设备驱动/网路合同栈-学习视频教程-腾讯课堂
二、设备驱动程序
所谓设备驱动程序,当然就是计算机硬件与外部设备进行通讯的插口。因为硬件设备各色各样,有了设备驱动程序,应用程序就可以不用在乎设备的具体细节,而便捷地与外部设备进行通讯。从外部设备读取数据,或是将数据写入外部设备linux驱动教程,即对设备进行控制。
三、设备驱动程序框架
设备的种类繁杂是可想而知的,所以设备的驱动程序也是各色各样的。由此须要构建一个统一的规范:SVR4(UnixSystemVRlease4)提出了DDI/DKI(Driver-DeviceInterface/Driver-KernelInterface)规范。这个SVR4是UNIX操作系统的一种内核标准。
规范分为以下三个部份:
其中,驱动程序与内核的插口是通过数据结构file_opration完成的。驱动程序与设备的插口描述了驱动程序怎样与设备交互,这与具体的设备是密切相关的。驱动程序与系统引导的插口似乎就是驱动程序对设备进行初始化。
四、简单的字符驱动程序
我在这儿直接将我编撰的字符驱动程序展示下来,之后对其进行剖析:
#include
#include
#include
#include
#include
#include
#include
#include
#include
#include
#include
MODULE_LICENSE("GPL");
#define MYCDEV_MAJOR 231
#define MYCDEV_SIZE 1024
static int mycdev_open(struct inode *inode,struct file *fp)
{
  return 0;
}
static int mycdev_release(struct inode *inode,struct file *fp)
{
  return 0;
}
static ssize_t mycdev_read(struct file *fp,char __user *buf,size_t size,loff_t *pos)
{
  unsigned long p = *pos;
  unsigned int count = size;
  char kernel_buf[MYCDEV_SIZE] = "This is mycdev!";
  int i;
  if(p >= MYCDEV_SIZE)
    return -1;
  if(count > MYCDEV_SIZE)
    count = MYCDEV_SIZE - p;
  if(copy_to_user(buf,kernel_buf,count) != 0){
      printk("read error!n");
      return -1;
    }
  printk("reader:%d bytes was read...n",count);
  return count;
}
static ssize_t mycdev_write(struct file *fp,const char __user *buf,size_t size,loff_t *pos)
{
  return size;
}
static const struct file_operations mycdev_fops =
{
  .owner = THIS_MODULE,
  .read = mycdev_read,
  .write = mycdev_write,
  .open = mycdev_open,
  .release = mycdev_release,
};
static int __init mycdev_init(void)
{
  int ret;
  printk("mycdev module is starting..n");
  ret = register_chrdev(MYCDEV_MAJOR,"my_cdev",&mycdev_fops);
  if(ret < 0)
  {
    printk("register failed..n");
    return 0;
  }
  else
  {
    printk("register success..n");
  }
  return 0;
}
static void __exit mycdev_exit(void)
{
  printk("mycdev module is leaving..n");
  unregister_chrdev(MYCDEV_MAJOR,"my_cdev");
}
module_init(mycdev_init);
module_exit(mycdev_exit);
首先看一下file_operation结构体,此结构体是该驱动程序的核心。它给出了对文件操作函数的定义。其实虚拟主机 linux,具体的实现函数是留给驱动程序编撰的:
struct file_operations {
struct module *owner;
loff_t (*llseek) (struct file *, loff_t, int);
ssize_t (*read) (struct file *, char __user *, size_t, loff_t *);
ssize_t (*write) (struct file *, const char __user *, size_t, loff_t *);
ssize_t (*aio_read) (struct kiocb *, const struct iovec *, unsigned long, loff_t);
ssize_t (*aio_write) (struct kiocb *, const struct iovec *, unsigned long, loff_t);
int (*readdir) (struct file *, void *, filldir_t);
unsigned int (*poll) (struct file *, struct poll_table_struct *);
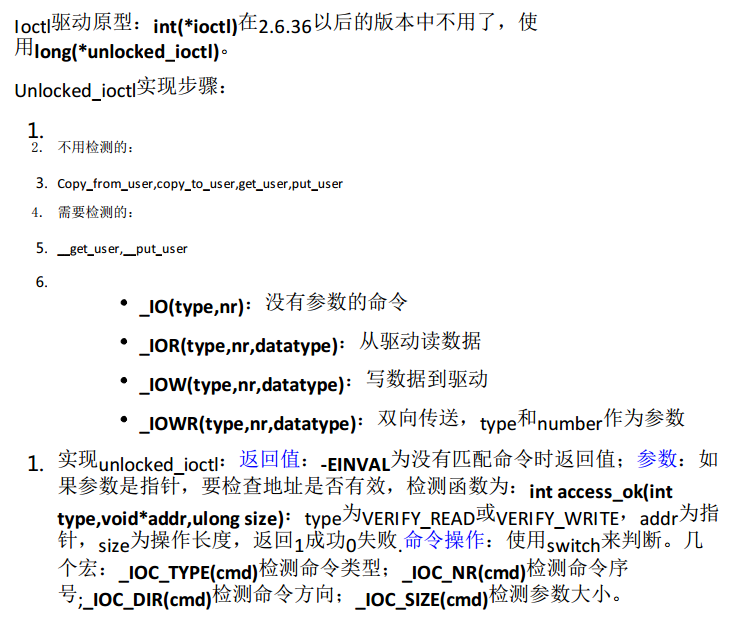
long (*unlocked_ioctl) (struct file *, unsigned int, unsigned long);
long (*compat_ioctl) (struct file *, unsigned int, unsigned long);
int (*mmap) (struct file *, struct vm_area_struct *);
int (*open) (struct inode *, struct file *);
int (*flush) (struct file *, fl_owner_t id);
int (*release) (struct inode *, struct file *);
int (*fsync) (struct file *, loff_t, loff_t, int datasync);
int (*aio_fsync) (struct kiocb *, int datasync);
int (*fasync) (int, struct file *, int);
int (*lock) (struct file *, int, struct file_lock *);
ssize_t (*sendpage) (struct file *, struct page *, int, size_t, loff_t *, int);
unsigned long (*get_unmapped_area)(struct file *, unsigned long, unsigned long, unsigned long, unsigned long);
int (*check_flags)(int);
int (*flock) (struct file *, int, struct file_lock *);
ssize_t (*splice_write)(struct pipe_inode_info *, struct file *, loff_t *, size_t, unsigned int);
ssize_t (*splice_read)(struct file *, loff_t *, struct pipe_inode_info *, size_t, unsigned int);
int (*setlease)(struct file *, long, struct file_lock **);
long (*fallocate)(struct file *file, int mode, loff_t offset,
loff_t len);
int (*show_fdinfo)(struct seq_file *m, struct file *f);
};此结构对文件操作的函数给出了定义。种类繁杂。
我们这儿的file_operation结构体进行初始化时仅初始化了4个函数。那些使用的函数在程序的前半部份早已给出了定义。
五、调试程序
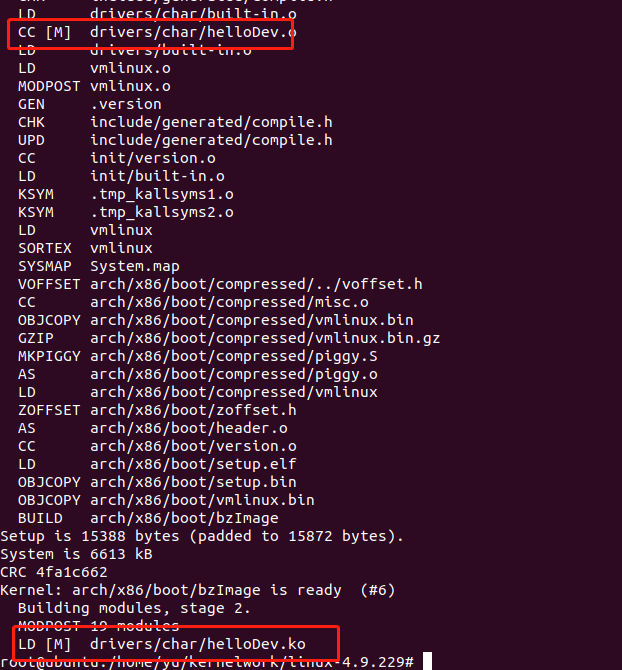
因为编撰的是内核模块,所以须要用make进行编译。这个我在之前的博客早已写过怎么编撰Makefile文件。编译完毕后将模块插入。
之后,通过cat/proc/devices来看系统中未使用的字符设备主设备号,我这儿听到的是my_cdev,对应的是231号。
接出来使用mknod命令创建设备文件结点,之后用chmod命令更改权限为777。此时设备就可以使用了。
这儿我们须要注意一下/proc/devices与/dev下的显示的设备的不同之处。
在/proc/devices下,显示的是驱动程序生成的设备及其主设备号。其中主设备号可拿来让mknod作为参数。
在/dev下的设备是mknod生成的设备,其中,用户通过使用/dev下的设备名来使用设备。
六、编写用户态测试程序
#include
#include
#include
#include
#include
#include
int main()
{
  int testdev;
  int i,ret;
  char buf[10];
  testdev = open("/dev/mycdev",O_RDWR);
  if(testdev == -1){
    printf("connot open file..n");
    exit(1);
  }
  if((ret = read(testdev,buf,10)) <10){
    printf("read error!n");
    exit(1);
  }
  for(i=0;i<10;i++)
    printf("%dn",buf[i]);
  close(testdev);
  return 0;
}
这个程序没哪些好说的。
七、运行结果
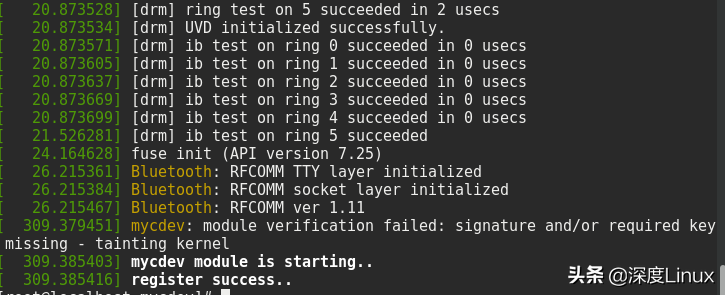
插入模块后查看日志信息:
运行测试程序:
这儿我们看见linux驱动教程,它输出了链表的前十个字节,对应着:Thisismy
查看日志信息:
这个我们看见,驱动也复印出了一段文字,十个字节被读取。
卸载模块:
八、总结
这儿只是简单地介绍了一下设备驱动程序的框架,作为一个对驱动程序的简单了解。
原文链接: